
How to fix the problem of network or Internet connections in Windows?
- The essence of the problem
- METHOD 1: Run the built-in network troubleshooting tool
- METHOD 2: Use the "Network Reset" function (for Windows 10 only)
- METHOD 3: Manually Assign IP Address and DNS
- METHOD 4: Using Registry Settings
- METHOD 5: Manually reset TCP / IP settings
Read the tutorial for troubleshooting various network connection issues in Windows . Five universal ways. You can also study our earlier article. "Internet Connection Troubleshooting Guide" in which we tried to consider a different range of problems when connecting to the Internet.  Content:
- The essence of the problem.
- Remedies:
The essence of the problem
The concept of the Internet today is very firmly established in our lives, and most people use it fully and everywhere. On the Internet, people are trained and gain knowledge; attend exhibitions and libraries; communicate through social networks and video communicators ( "Skype" , "Viber" , etc.); develop projects; transmit and receive information, letters and documents; learn and share news; watching movies and listening to music and more. Not surprisingly, the ability to access the Internet is supported by many different devices: personal computers, laptops, smartphones, tablets. All of them provide connection to the Internet in different ways: using a cable, using a “Wi-Fi connection” or using mobile access capabilities through the services of mobile operators.
Sometimes devices combine different ways of connecting to the Internet, for example, a laptop can be connected directly with a cable and using a Wi-Fi connection , a smartphone has a Wi-Fi connection and mobile Internet. But sometimes there are various problems with the connection, such as lack of connection, limited connection, lack of access to network drives or browsing web sites, etc. In this case, you encounter problems connecting to the Internet or local network in " Windows . Or get error notifications containing error codes. It happens that the “Ethernet” connection or the “Wi-Fi” function of your laptop does not work, or the connection settings fail. This situation is sad and you are trying to find a way out.
In this article we will try to tell you about the various problems with connecting to the Internet and how to solve them for different types of network and Internet connections in the Windows operating system. Most of the methods in this article will work in all versions of Windows , but some of them will be available only for certain operating systems.
We will try to list the main possible solutions to fix problems related to the network and Internet connection in “Windows” . You should try these solutions one by one. And one of them may be able to assist you in finding and fixing the problems that occurred.
METHOD 1: Run the built-in network troubleshooting tool
The first thing you should try to resolve network connection problems is to activate the built-in troubleshooting tool and network problems in “Windows” . This tool automatically diagnoses and finds the cause of the malfunction, and tries to correct the problem, if possible.
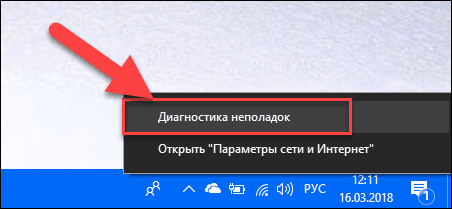
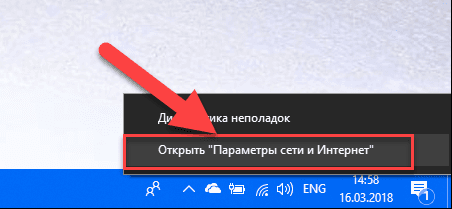
To launch the troubleshooter, right-click the Network icon located in the notification area of the Taskbar and select the Troubleshoot section from the pop-up menu.
A problem detection process will start, the result of which you will see in the Windows Network Diagnostics window.
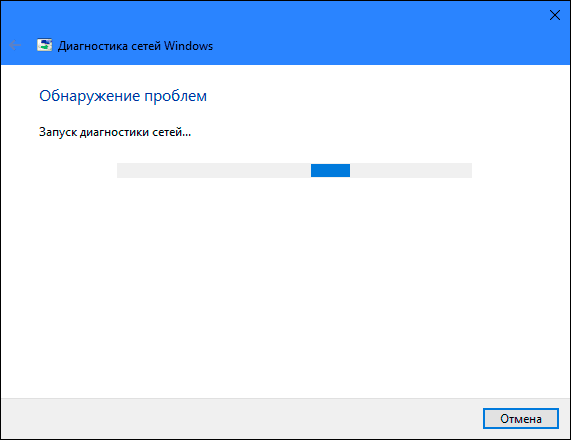
Wait a few seconds, during this time the tool will diagnose networks, perform troubleshooting, check the Internet connectivity, find the cause of the problem, and show how to fix it.
In most cases, this built-in problem detection tool completely resolves the problem and restores the Internet connection. As a last resort, he will point you to an existing malfunction and prompt you with a solution.
METHOD 2: Use the "Network Reset" function (for Windows 10 only)
Sometimes the built-in troubleshooting tool (described in method 1) cannot fix connectivity issues. Then you need to manually reset the network connection settings and network adapters.
And if you are using the “Windows 10” operating system, you can use the built-in “Network Reset” function to automatically reset the settings of network adapters and network components. This function first removes all installed network adapters and then reinstalls them. It also installs other network components to the initial settings.
The Network Reset feature was added to Windows 10 in the Windows 10 Anniversary Update version (version 1607). This feature was designed to help users solve connectivity issues after upgrading the operating system to "Windows 10" from a previous version of "Windows . " It can also perfectly assist users in troubleshooting network connectivity issues that they may have later on with further use.
To access the Reset Network feature, you just need to do the following:
Open the Settings app in one of three ways of your choice:
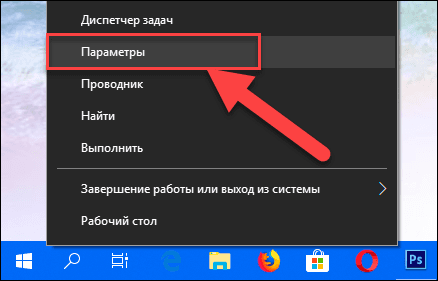
Method 1 : Right-click on the “Start” button or use the “Windows + X” key combination and select the “Settings” section in the pop-up menu.
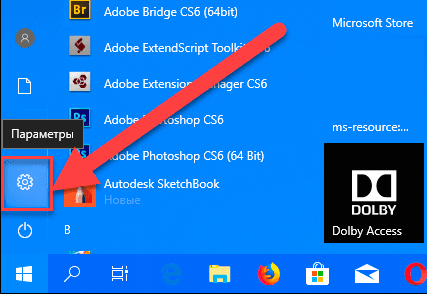
Method 2 : Click the "Start" button on the "Taskbar" and select the gear sign in the lower left corner of the pop-up menu.
Method 3 : The easiest way, press the key combination "Windows + I" together and open the "Options" window.
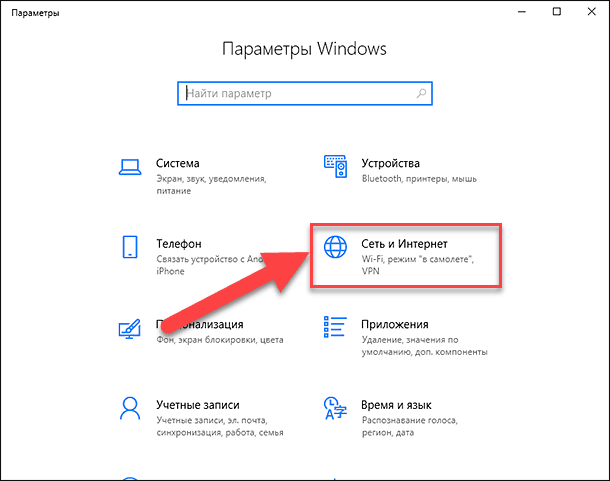
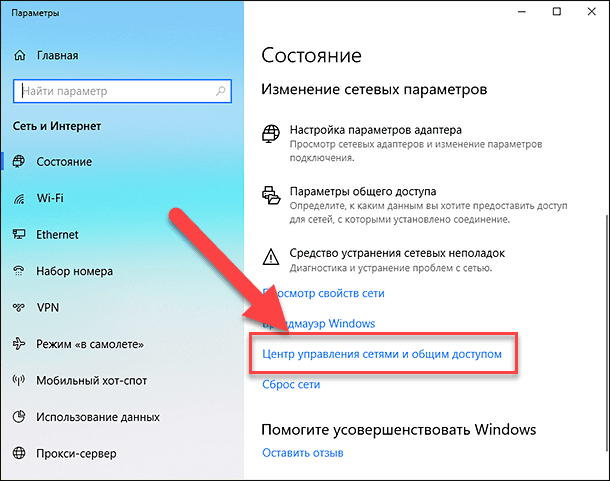
Now go to the “Network and Internet” section (shown in the figure above) and in the “Status” tab in the right pane of the window, lower the slider down and select the “Reset Network” link.
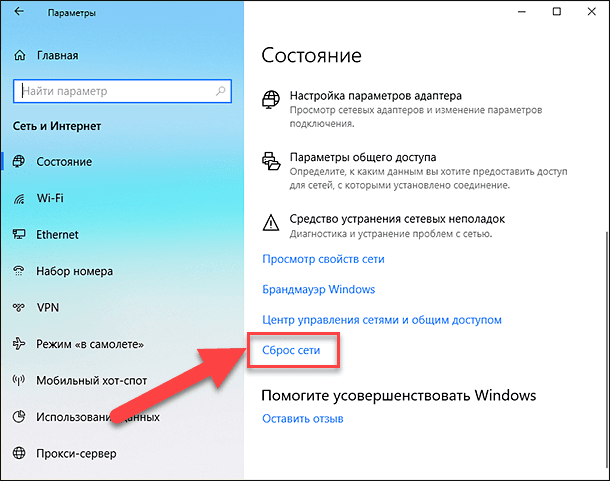
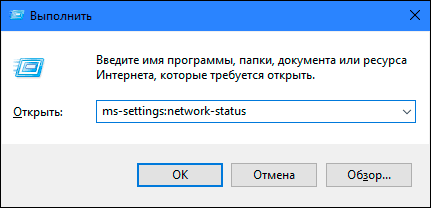
Note : Alternatively, if you are a supporter of the menu call from the command line, you can use the second method: press the "Windows + R" key combination together, in the "Run" window that opens , enter "ms-settings: network- status " and click " OK " to confirm. Select the “Reset Network” link, as shown in the image above.
A message appears on the screen stating that the “Network Reset” option will remove and reinstall all network adapters, and also restore all network components by default. Click the “Reset Now” button to launch the network reset function.
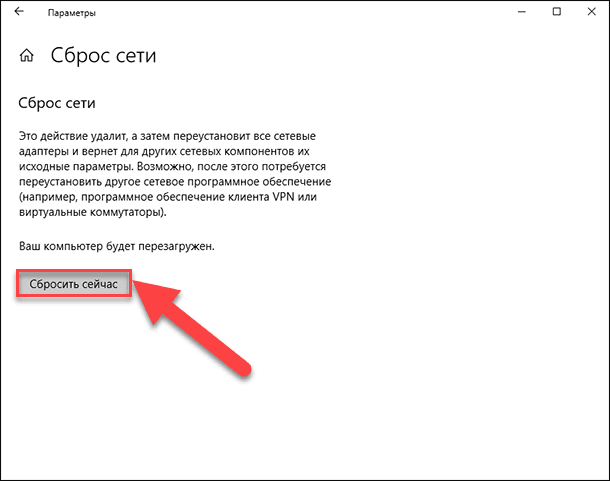
A confirmation message “Do you really want to reset the network?” Appears. Click "Yes" to confirm the selected action.
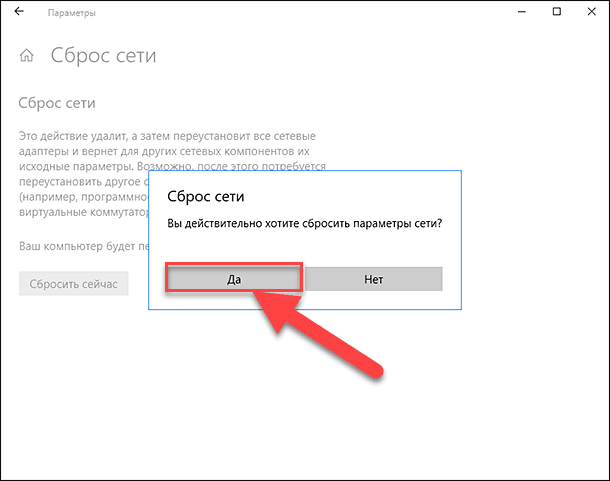
The Network Reset function will reset the network adapters and settings, and will also completely reboot your computer for the changes to take effect.
Note 1 : After using the Network Reset feature , you may need to reinstall and configure other network software, such as VPN client software or virtual switches, such as Hyper-V (if you are using network virtualization software).
Note 2 : The Network Reset feature automatically sets all known network connections to public network mode. This is done to make your computer more secure, as in the public network mode, your computer cannot be detected on other computers and devices on the network. You will have to reconfigure the settings to connect your personal computer to your home group (the network you trust) in order to share files or access the printer.
METHOD 3: Manually Assign IP Address and DNS
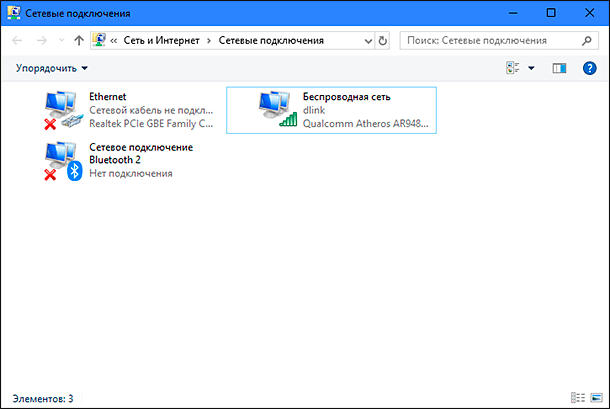
After upgrading previous versions of “Windows” to the latest “Windows 10” operating system, you may have a problem with Internet access. Sometimes this may be due to the problems of your Internet service provider, and you need to wait a few minutes, or contact the support service of the provider. However, if Internet access does not resume, then you need to check whether all the necessary protocols are included in the connection properties. Open the Network Connections window; this can be achieved in several ways:
Method 1 : Right-click on the Network icon, which is located in the notification area on the Taskbar , and select the Open Network and Internet Settings section from the pop-up menu.
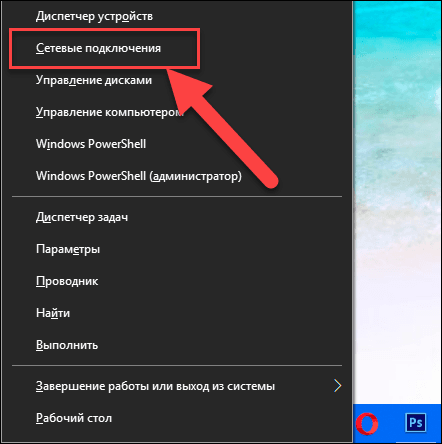
Or press the "Windows + X" key combination and select the "Network Connections" section .
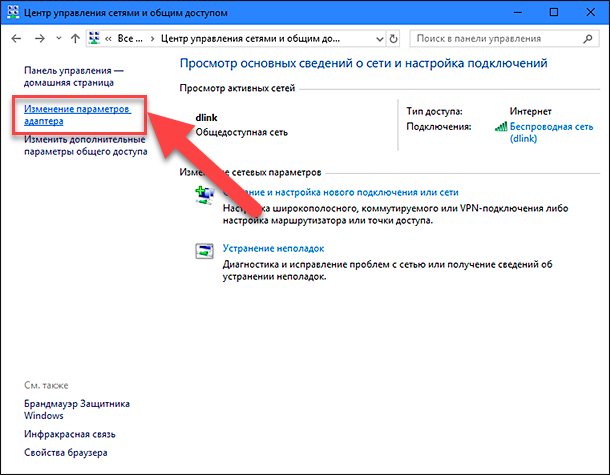
In the opened window in the right pane, lower the slider down and click the link "Network and Sharing Center" .
In the left side menu, click on the link "Change adapter settings . "
Method 2 : The easiest and fastest way, press the key combination together "Windows + R" , in the "Run" window , enter "ncpa.cpl" in the command line field.

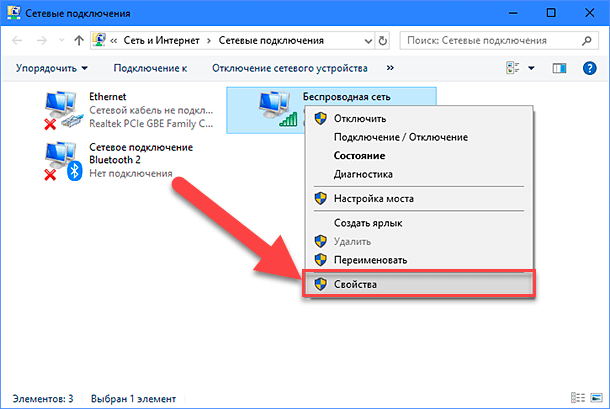
A list of connections will open in the Network Connections window. Click on the connection that you use to access the Internet, right-click and select "Properties" .
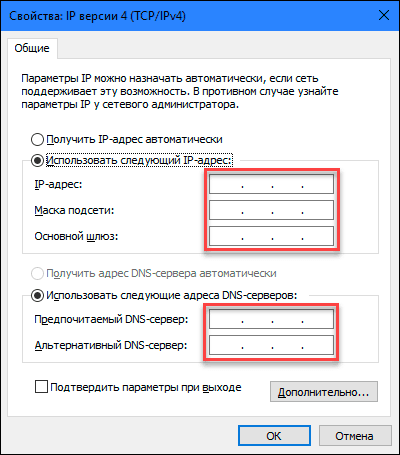
Pay attention to the section "Marked components are used by this connection" . It should be marked with a checkbox “IP version 4 (TCP / IPv4)” . Otherwise, you need to enable it by checking the box in the cell. If your protocols are enabled, and Internet access does not appear, then try to configure this protocol manually. Click the "Properties" button and go to the next settings window.
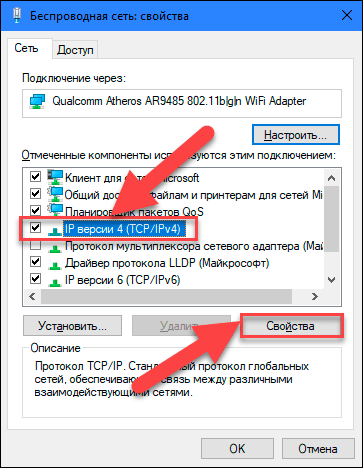
Check the "Use the following IP address" box and fill in the "IP Addresses" and "DNS Servers" fields. You can find out the input parameters by contacting the support service of your Internet service provider. Click "OK" to save the changes.
Now the problem with Internet access should disappear.
METHOD 4: Using Registry Settings
This method is suitable for "Windows 7, 8, 8.1" and only if none of the connection types are displayed in the Network Connections folder. Remember that the procedure for editing the registry requires you to care and accuracy. Otherwise, you can make erroneous changes and disrupt the correct operation of the operating system as a whole or its individual applications. Be sure to save the initial settings before editing the registry. In the main menu, click on the "File" tab and in the menu that opens, select the "Export" section. Title the registry file, select the path to store it, and click "Save . " Now you can always use the saved version of the registry, if the need arises.
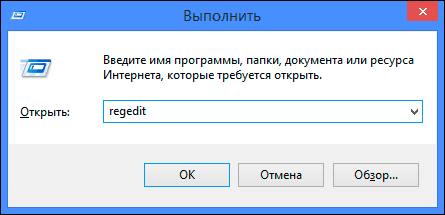
Call the window "Run" using the key combination "Windows + R" , in the field of the command line enter "regedit" and click "OK" to continue. The system will prompt you for permission to launch Registry Editor , click the "Yes" button to enter.
Then in the left pane of the Registry Editor window go to the following address:
HKEY_LOCAL_MACHINE \ SYSTEM \ CurrentControlSet \ Control \ Network
In the right pane of the window, you will see the binary key “Config” . Select it and press the Delete key on the keyboard, or right-click on it and in the menu that appears, click the Delete link.
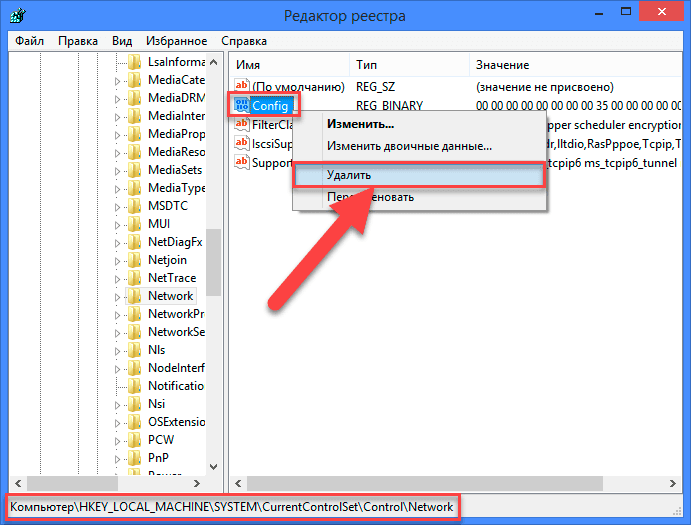
Do not worry. When you, after removing a key, open the Network Connections folder or restart the system, the Windows service automatically creates a new key. By removing the key, you simply clear the configuration cache.
Once you delete the key, close the registry editor and reopen the Network Connections folder, and now it should show all network connections without any problems.
METHOD 5: Manually reset TCP / IP settings
If you are not using the Windows 10 operating system, then you can manually reset network adapters and network settings using some built-in commands on the command line, and this should fix the problem.
Open a command prompt as an administrator using the "Windows + R" keyboard shortcut and type in "cmd" in the command line field.
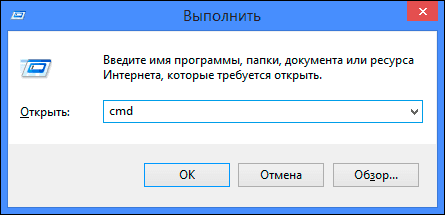
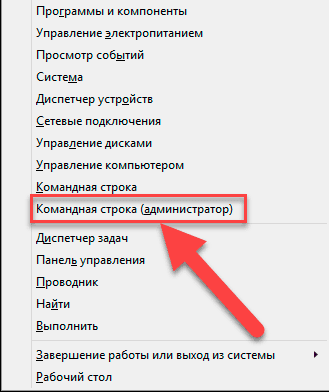
Or press the key combination "Windows + X" and select the "Command prompt (administrator)" section from the pop-up menu.
Then execute the following commands one after the other:
netsh winsock reset
netsh int ip reset
netcfg -d
ipconfig / release
ipconfig / renew
ipconfig / flushdns
ipconfig / registerdns
When finished, restart the computer. After rebooting, the problem with Internet access should be resolved. Now you can get full internet connection without any problems.
In this article we tried to describe some of the problems that arise when accessing the Internet, and how to overcome them. But this list is far from complete and it will be further supplemented by new methods for correcting errors and problems when connecting to the Internet.